Tips for taking effective 360 ° photos and 3D virtual tours
In this period of quarantine, it has been discovered or rediscovered the importance of having 360 ° photographs and creating virtual tours to present your properties to customers.
From vacation rentals to properties to sell, to restaurants, hotels to cars, adding 360 photos to your listings can help you win over satisfied customers. For real estate photographers, the demand for 3D virtual tours is fast becoming more common. And, for good reason.
Panoramic 360 tours offer the public an immersive and intuitive experience, which gives them a clear idea of a space they are interested in. While 360 ° panoramas are certainly grabbing attention, it is important, to produce them consciously, i.e. with a specific goal in mind. Make pictures that sell. Otherwise, you run the risk of giving the impression that the 3D tour are just showy and deceptive – when in fact they are powerful devices for communication and effective sales tools.
Therefore, we will try to understand in advance what the ultimate goal of the 360 ° photo we are going to achieve is. Or, you could create a tour for an Architect, who has to decorate, renovate or redesign a house or a room. Use 3D virtual tours to plan renovations, manage décor changes or simply to better understand a space before people have the opportunity to visit it in real life. To get the complete idea, you can check the Smithsonian Museum 3D Tour
Or even take 360 ° photographs to tell about a place, a hotel or a commercial activity, so as to involve a potential customer and make him immerse in the room before arriving on site.
Here are 10 tips to make your virtual tour effective so that a real estate photographer must ensure great results for their client.
1. Capture what your client’s audience wants to see

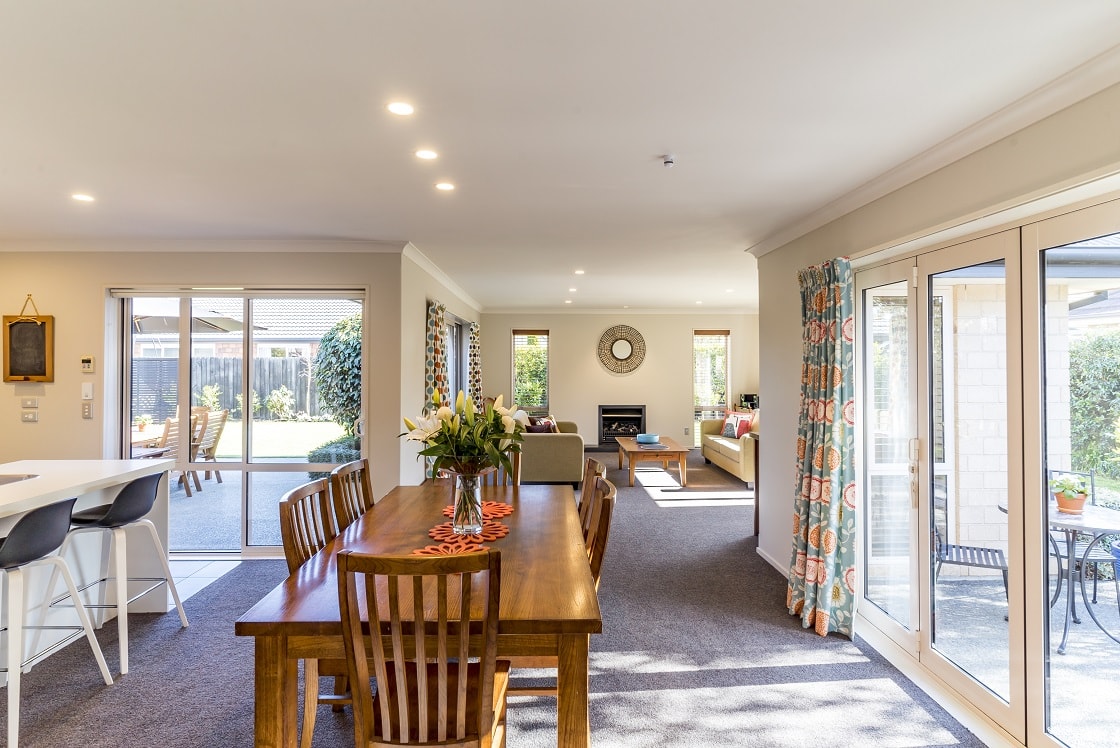
Taking a 3D tour relevant to your customers’ niche market basically comes down to knowing who the audience is and what is important to them. For example, let’s say your client is a real estate agent and your target audience is homebuyers. The object of the 360 ° photo is certainly to highlight those rooms that are most impactful and most important, depending on the target that will be interested in that house.
For example, if you have a large kitchen with beautiful windows overlooking the garden, and you do not visually capture those windows, a potential buyer may have doubts having only standard real estate photographs available, because it is easier to imagine through photographs a 360 °.
An effective 3D virtual tour will make the presence of the large windows abundantly clear, while an ineffective tour that does not show this information could cost time (and money) for all parties involved. When choosing a location to place the camera, it is important to make sure that the details that might interest the intended audience (in this case, the large windows overlooking the garden) are clearly visible.
When creating 3D tours, always remember the purpose of the shot and the value you want to communicate with your audience. In general, avoid views taken from the corners of rooms , instead, focus on what your audience wants to see.
2. Pay attention to what your audience shouldn’t see
While you want to focus on what’s important to your audience, you also want to avoid what’s irrelevant or distracting your audience. A virtual tour that shows too much can be detrimental to selling a product. Even worse, having unwanted images on your 3D virtual tour can adversely affect your audience – perhaps even only on a subconscious level – to the point where they no longer want to buy the card.
When shooting, be alert. You have to have the same foresight as a traditional photo shoot, avoid personal items, items for pets, messy closets and dirty spaces, if we talk about photography for houses for sale. While for commercial facilities it is important to avoid photographing an area, on cleaning day, or when work is being done inside the facility. Make sure any space is tidy and clean.
3. Check if the estate is ready to be photographed
The secret to a great photo shoot is great preparation. Which does not mean just ordering the various rooms. Preparing the house before creating the virtual tour can make it significantly more attractive and make the flow of footage more efficient, because you’ll be able to spend your time and focus on capturing instead of organizing.
You will probably want to communicate with the real estate agent, owner or facility manager first about what is required and let them take care of the staging before the scheduled shoot. They may or may not understand or follow instructions. If they don’t clean and stage the house to your liking, you may need to work around obstacles or use the occasion as an opportunity to educate the customer.
4. Edit your images after shooting
Once your 3D virtual tour has been shot, you will want to make some changes. Shooting real estate tours can be challenging, and often the only way to get good results is with good editing. The most common modification is to eliminate the tripod that holds the camera, so as not to let it come out in the 360 ° photo.
5. 3D virtual tour easy navigation
If your audience struggles to locate the panoramic image that interests them, they may soon give up and risk losing their attention. Get your target audience to find what they’re looking for by creating an intuitive and easy-to-navigate 3D virtual tour. There are 2 main types of navigation that are popular today: plan navigation and visual navigation.
Floorplan navigation uses a property floorplan to allow the public to click on points of interest placed directly on the floorplan. This is a very quick way to access visual elements because they are accessible for an entire floor at the same time.
Visual navigation requires a click on images to virtually move around a house incrementally. This type of navigation is notoriously used in Google Street view. It has the advantage of being more engaging, but is much slower than navigating the floor plan because you can’t jump straight to the room of interest, as this style of navigation requires your audience to click multiple times to switch between rooms.
6. Keep the camera low for most shots
When shooting panoramas, it is best to keep the camera at an average level. The ratio of the floor to the ceiling of the images will change according to the height of the camera. Generally, you’ll want to keep the camera at the same level for consistency, for all 360 photos you take.
The camera height should remain consistent throughout the tour of the house for maximum effect, it’s a good idea to lift the camera up in areas like kitchens and bathrooms to get those extra details that mean a lot to your target audience.
7. Choose the right 360 ° camera according to your needs
If you want to manage 360 ° photographs internally, there are many solutions, excellent solutions, of cameras that can help you take your photos.